How to Install Enphase Micro Inverter – Pro Tips You Need
Installing an Enphase microinverter doesn’t have to be complicated. With the right tools and a step-by-step approach, you can set up your system safely and efficiently.
This guide walks you through the basics so you can connect your panels with confidence and get your solar power flowing.
How to install Enphase micro inverter?
Mount the microinverter, connect to the solar panel and trunk cable, wire to the combiner box, then sync with the Enphase app.
Key Takeaway
- Enphase microinverters attach to each solar panel for efficient, panel-level control.
- Proper tools, safe wiring, and correct grounding are essential for setup.
- DIY is possible, but hiring a pro ensures safety, code compliance, and warranty protection.
- Use the Enphase app for activation, monitoring, and troubleshooting.
What Is an Enphase Micro Inverter?

An Enphase IQ8 microinverter is a compact device that connects directly to each solar panel. Instead of relying on one large inverter for the entire system, every panel is equipped with its own.
That setup means if one panel slacks off, the rest keep working at full drip. You also get cleaner power, easier monitoring, and fewer headaches down the road.
Think of it like giving each panel its own coach. The result? A solar setup that’s smarter, more flexible, and built to flex with your energy needs.
Tools and Materials Needed
- Enphase microinverter – the star of the show.
- Solar panels – make sure they’re compatible with your inverter.
- Mounting hardware – brackets, rails, and clamps to lock everything in.
- AC trunk cable – connects the microinverter to your home’s grid.
- Disconnect switch – for safe shut-offs during install or maintenance.
- Drill and driver bits – you’ll need these for mounting and fastening.
- Screwdrivers and pliers – the trusty sidekicks for wiring and adjustments.
- Safety gear – gloves, non-slip shoes, and a harness if you’re roof-hopping.
- Multimeter – to confirm connections aren’t playing tricks on you.
Pre-Installation Checklist
Before you start bolting down gear, get your basics right. Check that your roof or mounting area is solid, stable, and free from damage. Weak spots now mean bigger headaches later.
Confirm you’ve got the right Enphase microinverters for your panel model and system size. Mixing the wrong parts is like forcing mismatched puzzle pieces.
Make sure your electrical setup is ready for the job. That means breakers rated correctly, grounding in place, and enough capacity for extra load.
Have all the tools you’ll need lined up before climbing the ladder. Think screwdrivers, torque wrench, and safety gear. Being halfway up the roof and realising you forgot something is not the kind of workout you want.
Step-by-Step Installation Process
1. Prep Your Gear
Start with the basics. Make sure you’ve got your Enphase microinverter, solar panels, mounting hardware, and the right tools. Double-check the layout before you even touch a screw. This saves you from a messy do-over later.
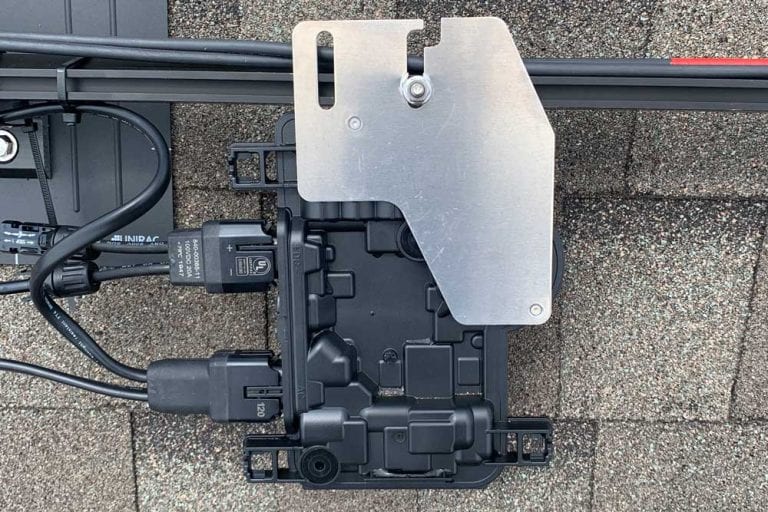
2. Mount the Microinverter
Secure the microinverter under the solar panel rack. It clips or bolts onto the rail, so placement is straightforward. Keep it shaded as much as possible, since excess heat is the enemy here.
3. Connect to the Rail Ground
Attach the microinverter’s grounding lug to the racking system. This step isn’t just technical; it’s safety 101. You’re protecting both your system and yourself.
4. Link the Microinverter to the Panel
Plug the microinverter’s DC input cables directly into the panel leads. The connectors snap into place, no special tools required. Think of it like pairing your AirPods, just way less glamorous.
5. String the Inverters Together
Use the provided trunk cable to link each microinverter. Each unit clicks into the cable, creating a chain that feeds power back to the combiner box. Keep the cable tidy; zip ties are your cheat code here.
6. Connect to the Combiner Box
Run the trunk cable into the combiner box where it ties into the AC wiring. This is the bridge between your microinverters and the main panel. If wiring feels sketchy, call a licensed electrician.
7. Test and Sync
Once everything’s wired, flip the breaker and power up the system. Sync the setup with the Enphase monitoring app so you can track performance from your phone. Nothing beats watching your panels start pulling their weight.
Configuring and Activating the System
Once your Enphase microinverter is wired up, it’s time to bring the system online. Fire up the Envoy or Enlighten app, connect it to your Wi-Fi, and let it scan for the inverters.
The app will show each panel popping up as it connects. Think of it like adding sneakers to a sneaker drop, one by one, they flex into the lineup.
When everything shows as active, run a quick test to confirm power flow. If the readings look good, you’re officially live. Your panels are now pulling their weight, quietly stacking energy credits while you chill.
Common Mistakes to Avoid
- Skipping the manual, thinking you’ve got it all figured out. Each microinverter brand has quirks, and missing them can fry your setup.
- Forgetting to shut off the power before wiring. Sounds obvious, but it’s the fastest way to wreck gear and yourself.
- Mounting in direct sun without airflow. Overheating kills microinverters quicker than bad coffee kills Mondays.
- Mixing cables or skipping proper grounding. One wrong connection can leave you chasing ghosts in your system.
Why Professional Installation Is Recommended

Sure, you could flex a DIY attempt, but one wrong wire and the whole setup tanks. Pros know the safety codes, the right tools, and how to keep warranties intact.
Hiring them saves you stress, keeps your system efficient, and ensures your panels actually produce energy instead of problems.
Maintenance and Monitoring Tips
Keep an eye on your Enphase app; it’s basically your system’s health tracker. Check for sudden dips in panel performance and act fast if one lags.
Clear dust and debris around panels so the inverters don’t overheat. A quick visual check every few months saves you stress and keeps the setup running smoothly.
Frequently Asked Questions
1. Do I need an electrician to install it?
If you’re not handy with wiring, yes. A licensed electrician keeps things safe and code-friendly.
2. How long does the install take?
Usually a few hours. Mount the unit, connect the wiring, then run system checks.
3. Can I connect it to my existing panels?
Yep. Enphase microinverters are designed to work panel by panel, so upgrades are flexible.
Conclusion
Installing an Enphase microinverter isn’t rocket science, but it does demand patience and precision. Once set up, you’ve got a solar system that runs smoother, delivers cleaner data, and lasts longer.
Take your time, follow the steps, and you’ll flex a system that keeps your panels working like clockwork.
Leave a comment